Wednesday, February 1, 2012

Spiral Top Little Man Hat


Thursday, January 5, 2012
I taught myself to knit my junior year of college following along a little starter kit from Walmart when I wanted to to add some fiber art to my resume.  Which of course never really ever took shape other than the idea sitting in my mind. For years I have started little projects here and there, my husband always joking that I have never actually finished anything.  I should have figured out a long time ago that scarves take a long time to knit!  So, as this winter season approached I decided I must accomplish a smaller goal and that would be to start knitting hats, shorter timeframe to make and also consistent with my skill level.  I wasn't sure I was going to find the look I wanted by searching the internet so I decided to just wing it a bit and after picking some fun colors of alpaca (I drove a ways to find a nice yarn shop: Out of the Loop), and would write the pattern out as I went.
So, the big thing about this and really all knitting projects I fail at is the counting! I just have way to much raging through my mind and I without fail loose count. Because I've been knitting for awhile I can kind of use visual clues but the easiest way to make this hat is really just keep a measuring tape near by and just knit until the measurement is what you want. It makes the knitting process so much more fun if you do the least amount of counting possible.

For my little man's hat it was important to measure from the bottom of his ear (I wanted the hat to cover them) to the part of his head right before it starts to round in. For him that was 5" he has a rather large head. If you'd like to try this pattern make sure to take that measurement. It will make your hat fit just right.

Supplies:
#5, 3.75mm circular needles (I use the bamboo ones)
A set of double sided needles the same size
Knitting/tapestry needle
Measuring tape/ruler
I changed colors so I need three balls of yarn but you can easily make this hat with one color and one ball of yarn. I used alpaca because it was so soft and warm

Get it Started:
 Cast on 100 stitches *(this may vary as well. This hat fits my little man who is almost four years old, but the diameter would also fit my husband, it's pretty universal. So, if you know for sure your recipient has a super tiny or uber large head just add or decrease your cast, but try and make sure that it is divisible by 4 that will be important later when thou are rounding off).

Here We Go:
 *Remember you are knitting in the round so make sure that your casts are not twisted and begin with your first knit in the stitch with the knot

 Ribbing 
Beginning with the color you want the majority of the hat to be

Rows 1-12 (or until the ribbing measures 1.5"): K1, P1 and repeat

Hat Body 

Rows 13-28
Continuing with the same color
 K in the round for the next 16 rows or until it measures 2"

Rows 29,30
Change to your second color (in this case I used green)
K in the round for the next two rows

Rows 31,32
Change to your third color (orange)
K in the round for two rows

Rows 33,34
Change to your original color (blue)
K in the round for two rows

Rows 35-40 Repeat the last six rows
 Total of twelve rows

You are going for this striped look:
Rows 41-50
Continue with your original color for 10 rows about 1.5" or until your hat measures the length you measured from the ear. In my case a total of 5" from the bottom of the folded ribbing to the beginning of where I'd round off the top of the hat.

The Spiral Top:
Continuing with the same color
 *at some point it will become to hard for you to continue on your circular needles at which time you will knit with your double sided needles to make your life much easier

 Row 51
(K2together, K23)and repeat another three times until you are at your starting point

 Row 52 (K2together, K22)and repeat in the same manner as above

 Row 53 (K2together, K21) repeat x3 total 4 and you continue for approx.the next 15 rows decreasing your number of knit stitches until you have eight stitches left.

At which time you use your tapestry needle to finish Now you just take care of your strings and your done!


 *to help your ribbing stay in place you could stitch it or take out your best friend the iron and show it whose boss(follow your yarns instructions you may need to cover with a towel)

 *this looks like a lot but it's really fun and easy once you get your rhythm so stay with it and cover your entire families' heads!

*On a side note I think this hat needs a Pom Pom! I will link up to that post once I add it!

Let me know if you need help or get stuck!

A Very Hearty Tuscan White Bean Soup


Wednesday, January 4, 2012
My first attempt at soup making began two nights ago when my husband requested the hearty Tuscan white bean soup recipe from Cooks Illustrated's: Soups, Stews, and Chilis. I liked the choice because it included things I had never done (soak beans, ingest kale) and I decided to add some chicken to the recipe to turn it into a meal for the whole family. The baby would receive some white beans, carrot and chicken from the soup and The little man would get a personalized bowl of soup heavy on the beans and chicken and minus the kale and tomatoes which were immediately rejected due to color alone.

The recipe called for dried white beans which meant that I had to sort threw them and pick out any bad ones I saw and then soak the pound of beans in a salt water bath that consisted of 16 cups of water and three tablespoons of salt for at least eight hours or up until 24 hours. Making sure to rinse thouroughly before adding them to the soup. They looked like this the next day when I was done soaking:
While the boys were taking there naps I chopped everything up and began to cook the bacon (the recipe called for pancetta but the butcher at the grocery didn't have it) in our dutch oven on the stovetop in the bit of oil for about eight minutes. When it started looking a nice brown I added the onions and celery and cooked for another twelve minutes:

I then added the garlic and cooked for about 30 seconds until it became fragrant (and boy was it!). I quickly added the broth, water, bay leaves, and the rinsed beans and turned up the heat to medium-high until boiling at which time I threw the cover on it and popped it in the oven to cook for bout 50 minutes.

I took it out of the oven and added the chopped kale, carrots, and diced tomatoes which really looked lovely together:


Then just put it back in the oven for another 30 minutes. Out it came, I pushed the sprig of rosemary down into it and covered the pot and let rest for 15 minutes. Then I uncovered and fished out the bay leaves and rosemary and chucked them. I added salt and pepper (frankly maybe a little too much pepper). The soup was done

et voila:

I baked a chicken breast for 40 minutes that I marinated in italian dressing chopped some pieces up into bits and added some to each of our servings: The rest of the soup I div-eed up for my husband's lunch and had about four servings left and threw it in the freezer so we'll see how that does on re-thaw.

I enjoyed this soup because it was pretty much a meal (we each had a dinner roll too), it got me to try kale which was actually kind of tasteless so I felt good about that and healthy, and although it seems like a lot written out it really wasn't hard. Next time I think I would add more bacon (I really didn't catch any of that flavor in my bowl and I'm a big fan of bacon). To me the skins of the beans were a little to noticeable so I'm going to do a little research on beans to see where I went wrong there.

Now what to do with the other half of the bunch of kale?

Ingredients:
4oz bacon (or 6oz pancetta)
1tbsp evoo
1large onion, chopped med
2 celery ribs, chopped med
8 garlic cloves, minced or pressed (I pressed but my fingers still smell)!
5cups low-sodium chicken broth
3cups water
1pound dried cannellini beans, salt soaked and rinsed
2 bay leaves
1 (14.5 oz) can diced tomatoes drained and rinsed
1/2 bunch of kale stemmed and chopped into 1 inch pieces
2 carrots, peeled and cut into 1/2 inch pieces
1 sprig fresh rosemary
salt and ground black pepper

Wednesday, May 12, 2010

An antiques blog that make your mouth water.  She also has an online store!


This is a 1950s Jivaro Tribe Red Feather Belt found in Illinois.    I think it would look absolutely incredible as a necklace.  amazing. beautiful.  Here are some other finds from the same trip:


You know I used to rock one of those shell necklaces!

Possibly my new favorite blog Erie Basin. (I'm pretty sure I first saw this via texturism again... my other favorite blog!)

Buttoning Patience

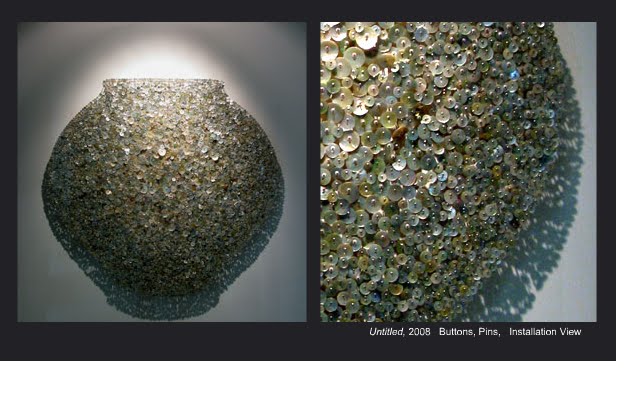
I can not stop staring at these amazing installations by artist Ran Hwang.  They are composed of buttons and they aren't glued so the buttons shift and have movement.  I would love to see one in person.


Definitely visit her website so you can see the many installations and enlarged photographs.  They are amazing.

Shatter!

I came across these interesting photographs by Martin Klimas out of Dusseldorf.  I love statues of girls in fancy dresses, but I love these photos of capturing them at the moment of being broken more!

Camp Vivier

I am love with this little bag perfect for summer.  An amazing shape and size by accessories designer Clare Guerrero Vivier

Wednesday, May 5, 2010

Stamp and Pant


In celebration of the new Animal Rescue: Adopt a Shelter Pet stamp collection, Halo will donate a million meals to shelter pets during the launch of the stamps.  Make sure you pick up these adorable faces and let your bill paying stampage go to a great cause: Stamps to the Rescue