Wednesday, February 29, 2012

The Bump Out Success


Hello All! Speaking of Spring, My paint color choices for the wall have really brightened my Bump Out!  I am VERY cautious with my paint colors and usually stick to blues and grays everywhere but alas I wanted a nice warm cherry blossom color!  So here is the stencil, here are the new sconces and  please notice all the new outlets and light switches!!!!  The stencil was a labor of love.  It took awhile and it needed to be quiet, no baby interruptions, but it finally got done!  I am exhausted just thinking about it but I really do love it everytime I walk by it.  It puts a smile on my face!  Please enjoy some pics!


 NEW BLINDS!! REALLY CLEAN UP MY OLD WINDOWS!

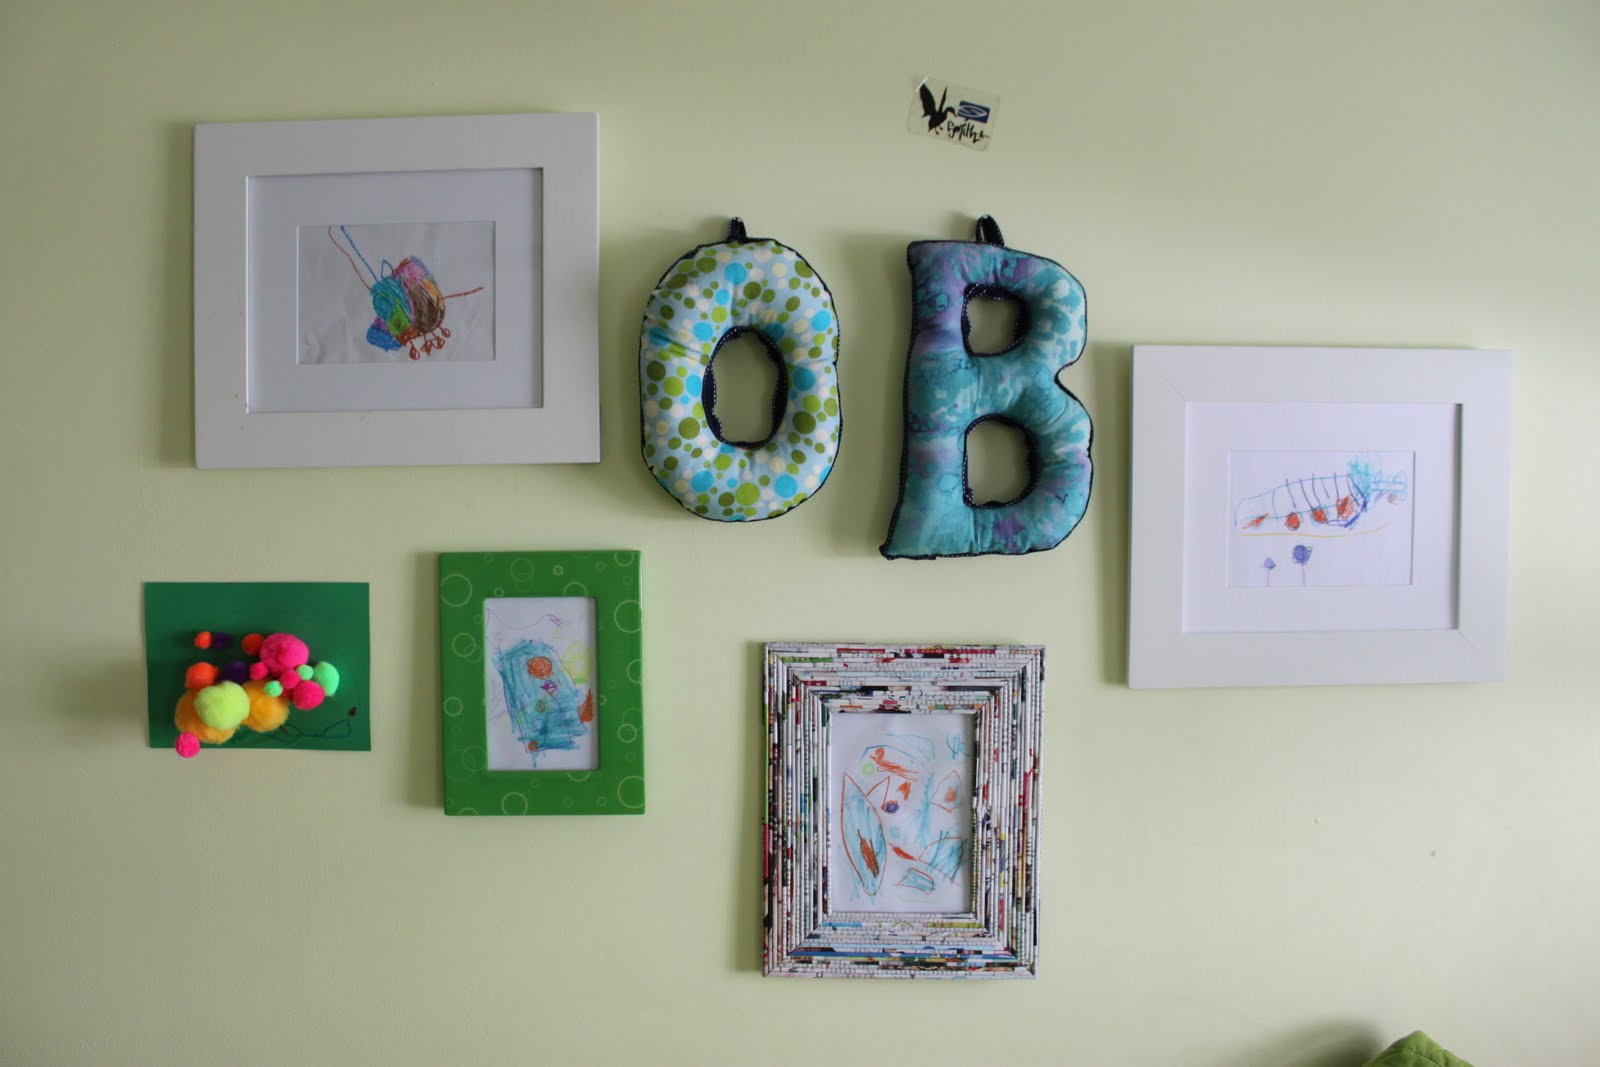
 ARTIST OF MY WALL ART IS NONE OTHER THAN ANNA BANANA~!!!
PS- if you noticed I picked a different wall to do the stencil because oh my goodness the other wall was sooo slanted I did not know how to start the stencil without it looking like the house was going to sink into the ground!!!- Meg

Monday, February 27, 2012

Planning for Spring Gardening

Little Man helping me start impatiens for the front of the house
it's a very shady section
The weather has absolutely been so inspiring... my gardening bug is twitching.  It was further fueled by my Mom's gift of a flower gardening book for my birthday.  It shows how to plan out your beds, talks about different kinds of gardens, and really makes you dream of the secret garden in your backyard.  
Last Year's Tulips outside

I know from experience that this does not happen easily.  The hardest part is weeding!  Keeping up on weeding with a child under 3, not the easiest task.  I don't like to use weed killer or anything of that nature.  So, last year I basically gave up after a wonderful bright display of tulips came up, I just watched as the weeds took over.  Ignoring it almost all together.

But, it didn't make me as happy as I thought it would, the not weeding.  This year I plan to get back on my diligent weeding path.  I'm a little worried about my tulips because they are already totally coming out of the ground, and it being February, I just hope they make it.  My husband plans on doing a little vegetable gardening (which most likely means I will be doing some vegetable gardening).  I plan on sticking to my flowers.  Maybe trying to change up the layout in the backyard, but mostly concentrating on starting a cutting garden which will make me pretty happy(beyond the weeds).  We are attempting to start some impatiens from seed for the front of the house, they really did well in the shade.
A few of last year's tulips
so bright and beautiful proving these colors exist in nature!
<3 Anna

Tuesday, February 21, 2012

Tag You're It: Tangerine Tango

Egon Schiele, Kneeling Girl in an Orange-Red Dress , 1910
It's been awhile since we had a great game of tag around here.  So, yesterday I informed Megan that I was tagging myself to find four inspirations for Pantone's Color of the Year, tangerine tango.  According to Pantone, "Tangerine Tango, a spirited reddish orange, continues to provide the energy boost we need to recharge and move forward."

John Singer Sargent, The Sulphur Match, 1882
Well, I feel invigorated don't you?  I thought I'd provide you all with artists that inspire me that have used their very own versions of Tangerine Tango in their works, some from over 100 years ago, their work still looks innovative and daring.  I hope you enjoy my tangerine tango inspiration from Schiele, Sargent, Bacon, Basquiat, and Twombly, some with a little pop and some with a lot! (I choose five instead of four because that's how I roll)


Francis Bacon, Portrait of Lucian Freud, 1965
Jean-Michel Basquiat,  Boy and Dog in a Johnnypump, 1982

Cy Twombly, Ferragosto V, 1961


Friday, February 17, 2012

Let's Have a Picnik


One of my favorite sites is closing down ironically on my birthday, April 19!  Until then you are allowed to use its fun premium features which is sooo exciting!  These are some old examples of how I used the site!  Enjoy, have some fun, make some art!
http://www.picnik.com/app#/home

Suspense!


I know I have alot of crafts pending right now and I wish I had more to blog!  But I want to give you the full experience when I am done.  Here is a sneak peak of my crafts for the upcoming Baptism for my little guy (don't you love nonpariells?)and a close up of some jerry-rigging we needed to do to make a sconce work in a old weird house that is wired like crazy!!!

Tuesday, February 14, 2012

Contemporary Art in an Unlikely Venue

Jeff Koons
I just got back from a six day stint at Maria Fareri Children's Hospital at the Westchester Medical Center.  The baby had breathing problems steaming from the RSV virus.  All that is far to medical for me and it was a terribly scary experience, but when he started feeling better it became easier for me to appreciate my surroundings.

For the first five days I enjoyed taking a look at all of the dolls that were on display in the Judy R. Rosenberg doll collection that were displayed in a long hallway on my way to get something to eat each day.  Clearly you would need a lot of space to collect all those dolls, and I don't have any collections to speak of.  But I am always comforted to see my Grandmother's little figurines on display.
Judy R. Rosenburg Doll Collection
When we were finally transferred from the floor of the PICU to the Pediatric Floor, I began to notice a spectacular collection of prints on display in the hallways.  One kept catching my eye and as I got closer to the tag, I read that it was a Jeff Koons print hanging near it was a Murakami print!  How exciting for me.  I tried to cruise around and look at the other images without appearing to be a wackadoodle parent.  There was a vast collection, and it was all very happy and wonderful.  What a wonderful environment for the children and a seriously fun contemporary art collection.  Here is a link to more info on the hospital's collection via the NYTimes
<3Anna

Tuesday, February 7, 2012

The Bump Out Continues

Just a quick preview of my labor of love.  In old houses there are alot of layers.  Alot of layers of wallpaper, alot of layers of paint, alot of layers of grime on the wood floors.  I love the story and the history of each generation painting a new layer on the walls- BUT what I never will understand is when you are putting another layer of paint on your walls, why would anyone paint right over the outlet plate cover and then the outlet- not once, not twice but several times!  Do they say to themselves "Hey- lets paint over these tiny slits in my wall that provide me with electricity, that will  be good for my appliances"  So here I am scoring the paint around the outlet and then prying it off without damaging the plaster walls! Not an easy task for me (a bull in a china shop).


I will be buying new outlet covers and my wonderful dad knows how to switch out outlets! ..... To be continued.............. ;0 Megan

Monday, February 6, 2012

Snack Pouch

My Little Man has to bring a snack each day to his pre-school.  For awhile I have been just slipping things into a ziploc bag and trying to remember to save it and use it again each day.  I fail at this.  So, I decided I needed to make something specifically for his snacks so I could cut down on my waste.  This spawned the snack pouch!

I decided I needed to have the word "Snacks" embroidered on it... just one small problem, I don't know how to embroider.  I didn't let this stop me!  I just thread the needle with some embroidery floss and went at it.  I'm sure there is a correct way of embroidering things but since we are talking about a pre-schooler's snack bag I figured I'd be safe in just going for it.  The orange color I was using had been left over from the blue booties.  I thought little goldfish would be cute on the bag because he always likes goldfish mixed with almonds for his snack!  I just drew the little fish on the bag with colored pencil and stitched back and forth to the outer edges of the line I had drawn.

I wanted a secure closure so I decided to sew a velcro closure.  It's really tight and nothing will be falling out.  I'm a little weary that crumbs might get stuck in the velcro but I'm hoping they will wash out when I wash the bag on the weekends.

This was really simple to put together. You basically cut a rectangle double the size of the actual bag you want.  Sew your velcro on the top of each side.  Then with right sides together just sew up the sides and secure your seam with a zig-zag stitch.  Done!

<3 Anna

I'm linking up here:
Craft-O-Maniac
Sumo's Sweet Stuff
Polly Want a Crafter?
Sew Can Do
Making the World Cuter
Marvelously Messy
Sew Chatty


Friday, February 3, 2012

The Bump Out

That is what I call the room in my house that bumps outside the regular footprint of my house- The Bump Out.  Its pretty much the best room in the house because of the three big windows right next to each other but very awkward because of a weird dividing wall.  And I know you are all wondering, but YES that mirror is attached to the wall! No getting that sucker off!


Of course I have been laboring over what to do with this room (as you can see from my paint samples on the wall).  I will have lived at my house for 3 years in June and the house hardly looks lived in.  I labor over paint color and where to put nails in the wall- BUT! I have finally bought new sconces, a stencil to paint on the wall, two paint colors and some frames.  Here are some "before" pictures above and in two weeks I will hopefully be able to post "after" pictures!!


I have also included my image board and as you can see I have yet to decide on frame arrangement.  I love the haphazard look almost as equally as I love the very order look!  Decisions! Decisions!!
- Megan

Thursday, February 2, 2012

Make Your Own Taco Seasoning! mmmmm!


Every Tuesday in our house is "Taco Tuesday" which is really fun and Little Man loves it.  He also is starting to grasp the days of the week a bit so I'll say, "we're having tacos tonight" to which he replies excitedly, "it's Tuesday"!  I also found it easier to feed him dinner if I stick to a schedule of things I know he likes.  One day a week I will try something new that way I know what things I can rotate in or not.  It makes it a lot easier and stress free eating.

In a move to cut a lot of preservatives and the yucky stuff I don't know how to pronounce  from our lives I decided that one way would be to make my own taco seasoning because let's face it this body doesn't handle MSG very well!  I cruised the Internet and settled on this recipe.  It was a little to spicy for Little Man so I modified it a bit and seriously it does taste like a taco should!  If you want all the spice make sure you add more red pepper and add black pepper according to the recipe above.  Did you know it was cumin that made a taco smell like a taco?  I did not know this!
Chicken Taco on whole wheat shell... Little Man refers
to this as a "burrito" because according to him all
soft shelled tacos are burritos.  I have learned to
only serve hard shell tacos on "Taco Tuesday" soft shelled
burritos are for another day :)


This recipe is for a really mild toddler-friendly version.  This is a portion for five different taco nights!  So you can make a bunch and store it in your cabinet.   When you are ready to use, Spoon out 2 tablespoons of your mixture and add it to your 1lb of browned meat(or cooked chicken) and add 2/3 cup of water.  Cook together for about five minutes.  It's delicious!


1/4 C. plus 1 Tbsp. Chili Powder
1 1/4 tsp. Garlic Powder
1 1/4 tsp. Onion Powder
dash of cayenne pepper (add more if you are spicy and you can also use flakes)
1 1/4 tsp. Dried Oregano
2 1/2 tsp. Paprika
2 Tbsp. plus 1 1/2 tsp. Ground Cumin 
1 Tbsp. plus 2 tsp. Sea Salt (any salt would do)2 tsp. of Coriander (because I'm obsessed with it)


-Anna

BTW Little Man does not eat "salad" which is lettuce, or tomatoes!  I didn't want anyone to get the wrong idea!  His taco consists of black beans, meat, and cheese.  I sneak grated carrots into his meat :)


Links:
Fireflies and Jellybeans: Show off your stuff party
House of Hepworths
Delightful Order
Marriage from Scratch

Wednesday, February 1, 2012

What is this Trickery?

Don't worry, it's not just you, it's been a really long time since we've blogged here.  For awhile I thought I would start a new blog because I was a little embarrassed that it had been so long here.  Whatever!  That's how we roll!  I hope everyone has had a nice year!  We have a total of three babes in our midst now... two from me and one new little man from Megs!
We have a lot of fun stuff to share with you, and I've learned a little more about blogging.  So, please join us and have fun reading along! :)

Impossibility Remains Impossible! An Update

Tuesday, January 24, 2012


Well, for the past few weeks I have been working when I can on my Impossibility Challenge which was to sew a dress.  I decided to challenge myself a bit more and instead of a sleeveless frock I stepped it up and picked a pattern with sleeves.  I found this wonderful english tan corduroy... I was excited.
Here's what I did, it's not pressed and I didn't finish the hem

Front

Back
Looks ok right?  I was feeling pretty good about this.  That is until I tried it on, and I use "try on" here as loosely as I possibly can.  You know what, "loosely" is really the worst word I can use.  In no way would this ever in my wildest dreams fit me.  Not if I lost 15 pounds... maybe if I was Kelly Ripa, not a 5'10" size 10!  I checked again and looked at the pattern to make sure I wasn't out of my mind.  It says size 10!  Maybe it's a junior size 10!  I'm pretty bummed, but know that I tried my best and took my time to follow the instructions.  I even watched a youtube video about making sleeves five times!

I really do wish it fit because it looks exactly like what I wanted.  I'm going to have to pick myself up and try again.  Get right back on the horse.  This pattern will be shelved.


Thistlewood Farm

Stuffed Initials and Children's Art

Monday, January 23, 2012
One of my favorite artists of all time is Cy Twombly.  His art has a child-like freedom and abandon that I have always responded to.  It has always made me strive to reach that place in my own work.  So, when I stumbled on this picture of the interior of his home my heart just lit up.  For some reason I completely respond to this image.  I don't actually like Roman heads and pink carpets... do I?  I think what I take away most is living with your artwork and letting your personality surround you in your home.  It's not important for your room to be something others want to live in because YOU have to live in it!  You might as well be happy with you.
"Roman Classic Surprise" Vogue, November 1966
featuring the artist Cy Twombly and his family in their home

I have a shameful admission and it is that after 3 1/2 years I still have not hung anything on the boys' walls.  Well I take that back, I hung one picture above their dresser.  It's really shameful.  When we were initially getting the room ready we painted it this fun yellow/green that resembles a margarita.  It was so bright and light in there that I just found myself lost as to what to do next.  Now that my son is a drawing and painting machine I thought the most logical next step would be to display some of his work.
Little Man's new wall decor
So, I decided, along with some framed artwork, that I would make him some stuffed letters to hang up.  He's learning how to write and he loves to know all the different letters.  He's especially proud of his own initials!  Also, the Little Man's favorite color is purple so I definitely wanted to find some fabric that had some purple in it.  I went to the craft store and stood in front of their little packs of quilting fabric for a LONG time!  Then I saw a kind of tied dyed looking fabric that I knew he would love it!  I thought it would be fun to pair it with some polka dots because he already has those on his valances (and I love polka dots)!  I knew that they didn't quite match but I went back to Cy's room in my mind and said the heck with it and got both!

For the letters I  just got  8.5x11 piece of computer paper and drew and cut them out.  I pinned them to my fabric (after ironing the fabric).  I sewed them together stuffed them and finished them off by hand sewing the opening.  I wanted to kind of solidify that they were meant to go together and hide the edges by hot glueing some ribbon around the outer and inner edges.


He absolutely loves looking at all his work and his initials.  I love how bright and playful it all looks and I am so proud of his cute little drawings of an elephant and a truck with flowers!  I also left a sticker he had stuck to the wall above the "B" because for awhile that's all he had up there and he did it himself!


Link Parties:
Sarahndipities
Sew Can Do
Everything Under the Moon
The Southern Institute: CreativeMeMonday

The Blue Booties


Wednesday, January 18, 2012
My booties have brought a lot of laughs to the house.  My husband gets perplexed when I make things that most people would clearly just buy.  I laugh in my head because I know that I secretly planned to make them blue and orange (like his favorite basketball team, Syracuse) to immediately trigger his mind to like them even though it may have been ridiculous for me to make them (and he did make a comment that he liked the blue and orange)!  I must say I had an extremely enjoyable experience planning and making these and they are pretty cute!

One of the first "prototypes"
 I designed my own little pattern pieces, first out of the felt because it was just easier for me to visualize and cut them while pinning.  I had a few "prototypes" and tried to just cut the pieces down to where they looked good to me.  I wanted a "shell toe" front piece which I'm not sure actually worked out.  Once I had my pieces looking good I took it all apart and traced the pieces on paper and scanned them into my computer just in case I ever wanted to make another pair.

Orange bottom... look out le bouton
Since The Baby is just learning to walk I still needed a soft bottom shoe.  After walking the aisles at the fabric store I settled on burlap for the bottom because I loved the orange color.  There is some non-slip paste I can buy that you get if you want to make your own rug which I think I'll try on the bottom because they do slip a bit on the ceramic floor.  I also added an elastic on the inside of the shoe to try and help it stay on his foot.  He still pulls them off but he would any shoe.

I think these were successful!  I think I'd make a few changes if I wanted to make another pair, but once I got everything down it didn't take me long to make the final pair.  I hope you like them too!

Links:
Not Just a Housewife
The Southern Product Queen
Rae Gun Ramblings
It's Overflowing
Chatty Chics
The Shady Porch
Uncommon Designs Online
Clean & Scentsible
Monday, January 16, 2012
As usual this weekend had me starting a billion different projects with a completion of none!  But I'm ok with that because each activity has a promising end!  I began my Impossibility project of sewing my new dress.  Which I decided to make out of a tan corduroy.  So far so good... I think.  I know a few things that I've done wrong so far but this is a learning process so I'm ok with that.

While in the sewing room I decided I also wanted to try and make the baby some booties.  He's just starting to learn how to walk so he still needs a soft bottom shoe he's not really ready for a sneaker or anything like that.  I haven't seen anything in the stores that I feel like spending $50+ bucks on, so after a suggestion from one of the moms at Little Man's school, I thought I'd take a stab at it.  It's starting to come together.
The bootie pieces out of felt and burlap

Pretty much the only thing I finished was a pom pom for my son's hat.  If you've ever wanted to know how to make a pom pom... here's how:

Tracing a circle out of two cardboard pieces with what else? A sippy cup

With your two pieces of cardboard together you begin winding your yarn
around the circle through the whole in the middle

This is what it looks like when wrapped up

Then you put your scissors in between each cardboard
piece and cut the yarn

Wrap the end of your yarn around the middle and
tie a knot (this holds it all together)

Snip the cardboard and slide it out

fluff it up a bit and now you have a pom pom!
I hope everyone had a nice weekend!

What's Happening


Saturday, January 14, 2012 
Just a quick note on this lovely (chilly) Saturday.

The first discussion for the Happy Homeys Book Club is up.  There is still plenty of time for you to catch up and start commenting anytime.  The book is wonderful so far!
Happy Homeys

Also if you are in the Hudson Valley, stop by Millstreet Loft's Riverside Gallery to for the Preview Reception for The Big Draw from 4-6 PM.  You can see hundreds of small works by local and national artists, including mine (I submitted two so hunt them down)!  

A Keeper: Beef Burgundy

Friday, January 13, 2012 


It is safe to say that I love pretty much anything that contains wine and mushrooms. For my next cooking adventure I decided to try a stew that contained just that, Beef Burgundy. I again used a recipe from the Soups, Stews, and Chilis cookbook.
My husband and I joke because I'm actually not that great at being a chef. It's really not my calling. You have to be clean and tidy and keep your workspace workable... have a great palate and taste things... know what you are doing. I am a slob. I hate tasting hot things. I like salt. I do not know what I am doing.

So, I've been trying to go against my inner being and clean up the kitchen as I go and leave things looking not like a bomb went off but as though it took me only minutes to create dinner and not five hours. There is a problem with doing this... the husband comes home to a tidy kitchen... nothing to see here, eats Beef Burgundy and tells you to put it in the "keeper recipes" log in your brain. This keeper recipe log is really small at the moment. It contains tacos, meatballs, white bean chili, and fried chicken. To add Beef Burgundy to it would be, well, not very practical. I could see pulling it out maybe once a month (or maybe twice a year) but either way it was tasty.

There were a few things I had never done before in this recipe. Buy salt pork? Cut salt pork! It look like a hunk of bacon and my arms hurt after trying to cut it into 1/4" matchsticks. While I was cutting I unfortunately came across a surprise that let me know just what part of the piggy was going on here. That was not cool.

Make an aromatic bouquet. Well that sounds lovely! I liked this part. I really like cheesecloth and I like that these things weren't going to be floating in my beef burgundy. I didn't feel like picking the carrot out from my son's stew this night.


Buy burgundy wine. Bless his heart (I like when I say things like that it makes me sound like a great grandma), the boy at the wine store who had to give me a lecture that burgundy was just a region of France and assured me that this bordeaux wine was the same as burgundy and would be fine. Why couldn't he have just given me a bottle of wine that read Burgundy in big black letters on the front?  That's what I wanted.  And I really didn't want to argue with him but I knew it was not the same. If it were why wouldn't my trusted Cooks Illustrated say bordeaux? They would have... boy. 

I tried out my new rice maker that I received as a gift from my Uncle whose time in Japan left him as a rice junkie.

Anywho, it turned out deliciously and it will be tagged as a keeper recipe.

Et Voila:

Imagine the Impossibilities


Thursday, January 12, 2012

So, I have to be honest, the first thing that came to mind when I heard about the Impossibilities Challenge was wallpaper. I have a hallway that I believe was once wallpapered before.  I think it is a plaster wall and it has a very strange texture. I painted it a lovely shade of gray (my favorite color). I painted right up the stairs meeting up to a nice buttery yellow. It's been a few years now and the paint is chipping all over the place. It's disturbing and upsetting mainly because I do not like house painting even a tiny bit and the thought of picking up a roller again is heartbreaking. I'm also not a big fan of wallpaper, I should actually say that I'm not a big fan of wallpaper that has fruits and eggplants and strange vines on it. That is what I was faced with in the house when I first moved in. Miles and miles of wallpaper. I fought with it so much it made me cry.

The fact that I would even consider hanging wallpaper back up is mind boggling, but I've decided it's the best decision. I went to the wallpaper store and informed the woman that I wanted something simple and gray. The first thing I picked I guess had glass beads involved and she basically told me no. We came up with this textured paper that has a checkerboard pattern on it.
I know I'm not taking any big risks with this one, but I really just wanted a gray wall so I think this will look nice.  She raised her eyebrows at me numerous times when I told her I would be going up the stairs with it and doing it myself. So, after much debate with my husband I have decided to already abandon this impossibility and make it a very possible goal by hiring someone to do it for me and making all the bad dreams of cutting angles and wallpaper paste disappear for good.  With all of the painting I have done in this house I will enjoy having someone else do it for me this time.

So, what's next? Finish Gone With the Wind? Maybe sometime in my thirties.

What I really really want to accomplish is sewing. It's been my life dream to know how to sew. Sure, I can make my sons their Halloween costumes but I struggle. I have a grandmother that is an expert, why do I not know? So, I have been sneaking away to get a few lessons from her, we are making a button down shirt. She assures me that once I'm done with that I will have a lot of useful knowledge under my belt. But she lives a couple of hours away and we haven't even gotten to the arms yet.

I need to do something now to keep this dream alive. So, by the end of January, I will be sewing myself a dress... no sleeves... little aggravation... just a little jumper. That's it. I will have to escape up to my "craft hole" (that's what I call because of the slanted ceilings I bump my head on and this crazy dark blue carpet). If I can pick up just an ounce of confidence I think it will be the start of something great!
My stack of vintage patterns I buy on Ebay and my fabric

So Cheers to conquering the Impossible!  Let's Go 2012!